Tuesday, February 12, 2013

Eat Your Greenies...Fritters Zucchini!

These are a great quick whip up wonder and for mine, tick lots of those required boxes in the kitchen.

1. They taste deelish.
2. They are easy peasy lemon squeezy.
3. They have lots of good, fresh stuff in them.
4. Only a few ingredients.


So here we go....get some greenies into you and your munchkins minus the whinging and arguing!

You'll Need:
3 medium zucchini (or two large)
1/2 red onion
100g fetta
handful of fresh herbs (basil, parsley, mint or a mixture work well)
1/2 cup self raising flour
1 tbs light sour cream
2 eggs
1 tsp ground nutmeg
pinch salt & pepper
4 tbs regular olive oil

To Make:
1. Coarsley grate the zucchini and onion. Place them into a clean tea towell, twist the top and squeeze the ball at the bottom over the sink to remove the extra liquid. (this will help the fritters stay crispy when you cook them) Throw the zucchini and onion into a medium mixing bowl.


2. Grate or crumble the fetta into the bowl and add the roughly torn or chopped herbs, flour, nutmeg and salt & pepper

3. Use a spatular or spoon to mix until all combined.

4. Whisk the eggs and sour cream in a small jug or bowl and add to the zucchini.

5. Mix until just combined (don't over mix or your fritters will get tough and rubbery - lumps are good!)

6. Heat a large frying pan oven medium high heat for around 3 minutes. Add half of the oil and allow to get hot for a minute or so. Carefully drop dollops of the mixture into the oil with two spoons, using one spoon to scoop and hold the mix and another to push it off gently. Use the back of the spoon to flatten it a little.

7. Cook one side for a couple of minutes or until it looks golden brown. Flip them over using an egg slide and a spatula. Use the slide underneath and the spatula to push them onto it. Be careful but confident when you flip and always keep everything as close to the pan as you can.

8. When the other side is golden brown and they feel firmish in the centre remove them from the pan and place on a cake rack with some paper towell on the bench underneath to cool. (see top pic)

9. Repeat cooking with rest of the mix and serve as soon as you can with whatever you fancy.

Tips:
*cooling on the rack with the paper towell on the bench underneath makes sure the oil drains away from the fritters keeping them crispier - this is a great Janelle Bloom tip!
*I like to mix equal amounts of whole egg mayo with light sour cream and a dash of ketchup to serve with them as a dipping sauce!
*Leftovers can be stored in an airtight container in the fridge and eaten in lunch boxes the next day or gently reheated in a frypan, and served with some eggs any way you like em, for breakkie!


Friday, January 6, 2012

Jooj Up Your Salad Repetoire! Warm Chorizo & Roast Tomato Salad


While it's summertime in the Southern Hemisphere we tend to eat a lot more salads, making the most of bbq's and lighter eating during the warmer months.

I know I'm guilty of getting stuck in a salad rutt, trotting out the same old cherry tomatoes and iceberg lettuce night after night! Well it's time to bust out and get creative. This warm salad is super easy to make, tastes amazing and dresses itself (yes! no nudie salads here!). It could also be a great light lunch as well as going beautifully with some grilled chicken, bbq steak or pan fried fish fillets for a quick and tasty dinner. So follow these steps and serve up a salad with some "jooj" today!

You'll need:
1 chorizo sausage sliced into 1cm pieces
1 bag of pre-washed baby spinach
1 cup canned white or cannellini beans (drained and rinsed well)
4 roma tomatoes
2 tbs balsamic vinegar
olive oil
S&P
1 tbs dried rosemary, thyme or oregano (or a combination)

To make:
1. Quarter the tomatoes lengthways and place on a baking tray lined with baking paper. Drizzle with olive oil and sprinkle with herbs and S&P. Pop into the oven at 120 degrees C for about 20 mins.
2. Heat a small frypan over medium high heat, add a splash of olive oil and the chorizo pieces, cook until crisp and golden and turn allowing for the same to happen on the other side. Turn off the heat and leave in pan.
3. Place the spinach in your serving bowl.
4. When the tomatoes are done remove tray from the oven and add the balsamic, beans and chorizo, with the oil that is in the frypan, to the baking tray. Return to the oven for a couple of minutes to warm the beans.
5. Remove tray from the oven and toss gently with some tongs to combine the ingredients.
6. Pour chorizo, bean and tomato mix over the spinach leaves along with the juices which will form the dressing. Squeeze over some lemon juice for extra pizazz if you like!
7. Ole! Serve and enjoy.

Tips & Tricks!
*if you need to be super quick substitute the roma tomatoes for 1/2 cup of drained semi dried tomatoes from a jar or the deli, omit step 1 and add them to the mix in step 4.
*this could also be tossed with some freshly cooked pasta to create a whole new meal or with some pre-cooked cooled pasta to create a pasta salad.
*warming or cooking tomatoes brings out the sweetness and might make them more friendly to younger palates (ie. kids!)
*chorizo is a spanish sausage avail at delis or in the cold section of good supermarkets

Wednesday, October 12, 2011

8 Minute Fried Rice...perfect for the whole family!

Even as a food-a-holic I know that sometimes it's hard to feel inspired, difficult to get motivated and tiring trying to think of something new but simple in the kitchen! When kids are thrown into the mix it gets even trickier. Those little munchkins can be fussy, picky, whingy and unpredictable. What they love one day they don't like the next. And when you throw into the mix our busy lifestyles  meal times can be an absolute nightmare!

Well here's a little dream to help you get through.....my healthy and nutritious but still delicious "8 Minute Fried Rice".

You'll Need:
*1 tbs olive, sunflower or peanut oil
*2 x 250g pkts 90 second brown rice
*175g short cut rindless bacon (chopped roughly)
*1 x 400g bag of ready made coleslaw (or the same amount of grated carrot & finely sliced cabbage)
*150g or a large handful of fresh bean shoots (or substitute for canned)
*2 eggs (lightly beaten)
*1/3 cup frozen or canned corn kernels
*1/3 cup frozen peas
*1 tbs kecap manis (sweet soy)
*1 tbs soy sauce
*1 tbs sweet chilli sauce

To Make:
  1. Cook the rice in the microwave according to the packet directions.
  2. Heat a large heavy based frypan or wok over medium high heat for a minute and add the oil.
  3. Throw in the bacon and stir occasionally until just browning.
  4. Add the rice and mix to coat the outsides of the rice with the oil. Try to separate any clumps of rice.
  5. Add the coleslaw and beanshoots and combine.
  6. Add the corn and peas and mix through well.
  7. Stir through the sauces and combine well.
  8. Stir until coleslaw just started to wilt and soften.
  9. Make a well or hole in the centre of the pan and pour in the beaten egg. Allow to cook for about 20 seconds and then stir through. The heat of the rice will cook the egg.
  10. Serve as a side to some fish, chicken or beef or on it's own with a drizzle of extra kecap manis if desired.
This recipe is also fantastic cold as a great lunch idea to take to school or work. Simply place any leftovers in a sealed plastic container and refrigerate for 2-3 days. It makes a great alternative to a sandwich and is just as delicious cold.

I also often make a batch and divide between some plastic take-away containers and place in the freezer for when you need a quick snack or lunch.

You can substitute white rice for the brown rice but as brown rice is less refined it is healthier for us and will make you feel full for longer because the body takes longer to break it down. Once the sauces are mixed through the white rice looks brown anyway so your kids won't know the difference.

Give it a try and I promise it will become a regular lifesaver from the common kitchen nightmare!

Til next time,
Chin chin xx

PS The coleslaw mix I use has spring onions, celery mixed through the usual carrot and cabbage for a little extra veggie variety.

Tuesday, October 11, 2011

Absolutely Asaparagus!

Did you know that Victoria's Cardinia shire produces more than 90% of Australia's asparagus? That's right...areas like Koo Wee Rup are where it's at as far as the little green stalk goes. A few weeks ago I was lucky enough to be invited to tour this region and check out the this and that of asparagus.


We began in the production area of the farm where many busy hands were sorting, shuffling and springing spears in every direction. It was amazing to watch and a great reminder of exactly how much work and effort goes into getting our fresh produce from the farm to our tables. From this farm some asparagus is exported to countries like Japan and more is delivered straight to our local supermarkets and markets so it can make its way onto our dinner plates. Of course, freshest is always bestest so if you're ever down that way you can also purchase super fresh bunches straight from the farm gate.


Out in the farm fields it was amazing to see the little stalks shooting up above the ground and growing almost before our very eyes. In the right conditions a spear of asparagus can grown up to 25cm in one day. When I saw the farmers in the fields watching the growth and cutting them at just the right time I was again reminded of the work that is put in at grass roots level to bring us our fresh produce. It was all a completely manual, hands on process!

Asparagus season in Victoria runs from September to March which means that asparagus is a great addition to all those spring and summer salads and bbqs. For a whole range of great recipes using asparagus you can check out the recipe library at http://www.asparagus.com.au/Recipes%20&%20Tips/ There are also tips on buying and storing your asparagus. I have been making the most of asparagus season already and have a whole span of spears in my freezer to utilise when the season is over. I have simply plunged my fresh asparagus into some lightly salted boiling water for 30 seconds or so and then into some iced water until cold. I then sealed them in some zip lock bags and placed in the freezer for a time when the sun isn't shining.

When fresh, asaparagus will last up to 5 days in your chiller compartment in a sealed plastic bag. You can also wrap it in some damp paper towl before placing into the bag to help prolong it's life even longer.

The ends of asparagus can sometimes be a little woody so they are best removed before cooking. I just use my fingers to bend the asparagus near the end and you will find it will snap right where the woody part ends and you are left with tender spears ready for cooking. This is a great job for the kids...they love the snap!


Classic partners to fresh asparagus are hollandaise sauce, bacon or proscuitto, smoked salmon, cheeses like blue or brie, eggs and chicken. It's always good to think outside the spear however so don't be scared to throw some into a stir-fry, add it to a salad or toss it with some pasta. A great little nibble is to take some baby cos lettuce leaves, top them with a slice of blue cheese add some spears of asparagus and sprinkle with walnuts. Drizzle with a little olive oil and sprinkle with some S&P and serve with a delicious cocktail or a glass of wine.


So this spring and summer get some asparagus onto your plate!

Til next time
Chin chin xx

Thursday, October 6, 2011

To Line or Not To Line?!?!

When it comes to baking, I find that the pitfalls are many, but they are not many enough to deter me from wanting to whip up a gorgeous cake, an oozy cookie or a fluffy muffin. No! No pitfall can stop me from baking!!

The pitfalls I am referring to can be anything from over beating, resulting in a tough finished product, to leaving out ingredients or forgetting to pre-heat the oven. Most pitfalls however, do have a solution and thankfully today I am going to dish one up in an effort to improve your baking prowess!

A very common baking issue is the dreaded STICK! It happens unexpectedly. You look, hopefully through the oven window to see your gorgeous cake browned and sitting up in the pan announcing itself ready. You open the door, give her a press and she bounces right back. The smells in the air are telling you she's done baby! You bring her out and let her cool before turning that pan carefully over above the cake rack and.....nothing. Aha....the dreaded STICK! You shake it, you run knives around it, you jiggle your best spatula and still....nothing! All that effort, all that time and all those ingredients have amounted to a disaster. The solution? TO LINE!

I always, always, always grease and line my pans before baking. Yes it does take a little more time but if it means that my baking will always pop out beautifully it's all worth it for me! I usually spray with some cooking spray but of course a real purist would rub with some soft butter. My nan, always made me do it using the paper that the butter is wrapped in. Don't be shy here...give it a good covering. Now the baking paper. If it's a straight sided tin you may be able to use one piece and press it down well into the corners. If you want a perfect edge however I always trace the bottom of the tin onto the paper and cut it out to make the base piece and then cut strips to go around the sides. The greasing will help keep the paper in place so don't be scared to add a little extra if you have floppy bits. I once read that if you line your sides up higher than the tin it will also help your baked goodies to rise.I haven't personally visited a laboratory and had that clinically tested but I go with it!

Now the round tin. Again you can trace the bottom shape onto the baking paper and cut it out and then use strips for the side but I find it quicker and easier to make a little cartouche. Yes, I know very posh french cooking word being used; hope you're impressed!! So a cartouche is a paper circle that you can use on top of sauces to stop those nasty skin bits forming or you can use one as a makeshift lid to keep moisture in your saucepan. In this instance I use it to line the bottom of my circular cake tin. Stay tuned for the lesson in pictures.....

1. Tear off a square piece of baking paper big enough to cover over the top of your tin....

2. Fold it in half and then in half again...(yes, quarters!)
 

3. Continue to fold in half repeating making a traingle that gets smaller and smaller.


4. When it gets too tricky to go any further place the skinny triangle shape over the tin placing the tip above the centre point of the indside of the tin. Then cut the end off where the edge of the tin is.


5. Unravel your paper and you should have a gorgeous circle of baking paper that will fit pretty close to perfectly inside your tin....aha Cinderella it fits!!


6. Cut some strips of paper to line around the sides of your tin and you're ready to pour in your cake batter and bake to your hearts content knowing that the turn out will be followed by a triumphant cheer and a smile of sweet satisfaction.

So in answer to the  originally posed question...yes TO LINE! And they all baked happily ever after.....

Chin chin xx


Tuesday, September 20, 2011

Hoeing Down in Honkers!

It's been a busy few months to say the least. I've jam packed a lot in (and here I'm talking about my life as well as my stomach!) I've been causing a ruckus on some food styling sets; film and photography, hobknobbing at some food shows and events and jetsetting on a whim. But no matter what I'm doing my love of food remains...for some reason, no matter how I'm feeling, food always brings me back to a better place.

I mentioned jetsetting on a whim and that included a trip to Hong Kong with a fabulous girlie friend. It was all a bit spare of the moment but somehow felt just right and I was pumped and ready for four days of strictly nothing else but food and shopping. Perfect! As my girlie friend is a travel agent extraordinaire all the details (boring ones from my perspective!) were taken care of, so all I had to do was pop out to the airport and get on board!

Arriving in Honkers (or Honkers Konkers as it became affectionately known to us) it was humid, bustling and alive. Whilst there are people every which way it is entirely organised and sensible and everything just seems to work. An easy trip from the airport on the fast train to the centre of Kowloon and a quick shuttle bus had us in our hotel lobby less than an hour after touch down. Impressive! It was still only 8am but we were ready to fill out bellies and empty our purses (and then our bank accounts!)

We went underground to the subway at Tsim Sha Tsui, right under our hotel and wooshed one stop to Hung Hom where we swapped trains and headed into China to the shopper's paradise of Shen Zhen. Alighting at Lo Wu station we crossed through immigration, passports and visas at the ready thanks again to the travel agent extraordinaire, and headed into the Lo Wu shopping centre. Our first job was to negotiate the incredible maze of tailors on the top floor, weaving our way through cubicles full of fabrics. We knew we wanted to get some clothes made and if it was going to be done before the end of the day we had to get cracking. After showing some photos and some samples of garments we picked out fabrics, had our measurements taken and were free to go and explore while someone took all of our vital statistics to a factory and magically created our wishlist.

Ravenous by this stage we went in search of sustinance and found a traditional Chinese restaurant right outside the tailors' maze and acosted the hostess for a number. For those playing at home it was called Arcadia and was really reasonably priced. We waited in line for a table listening as the numbers were called in Chinese of course. I wasn't sure exactly how we would know when it was our turn but fortunately the hostess signalled to us when we were up and we obediently followed her passed the live fish tank and through a mass of tables covered in gold cloths. One foodie and one travel agent were seated and ready for eating. Ravenous at this point I could happily have ordered one of everything on the menu but was talked down by my travel partner and we settled on a serve of shou mai (steamed dumplings with pork and prawn), egg fried rice, bbq pork buns, pork belly and some steamed vegetables. Needless to say it was all gorgeous. I couldn't get enough of the sticky, rich and crispy pork belly. The fat had been rendered leaving the meat tender and juicy with skin that crunched like breaking glass. I have to admit that I'm not always a big fan of bbq pork buns as often the coating is glutenous and stodgy but these were light and fluffy and almost melted in your mouth, filled with a warm, rich pile of sauced up pork. The shou mai were flavoursome and firm and just the way they should be. So good I almost didn't need soy sauce! After it was all devoured we clinked our glasses to a great start to our Honkers Konkers mini break.


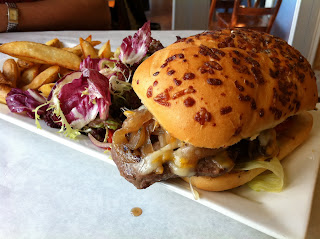
On an excursion to Stanley to explore the markets and continue the credit card damage we once again found ourselves....starving! It seems that all that opening and closing of your purse can really work up an appetite. As we walked along the glistening waterfront we happened across a little place called The Boathouse which looked like just what we needed. Once we entered there were definitely bonus points for the view and the airconditioning. We were greeted by a gorgeous woman whose service and manner was so lovely. Our refreshing and delicious fresh lime and sodas were on the table before we could blink...just the way a sweaty shopper likes them! Having indulged in almost as many dumpling as even I could handle, we evidently both had a hankering for something a little more Western. I ordered a burger with everything and my girlie pal went for the steak sandwich. When it arrived I couldn't have been happier and when I tasted it I realised I actually was! I think in between mouthfuls I even uttered the phrase "best burger I've ever had....I think it's the bun!" And I still think it was, a gorgeous brioche type arrangement but I do have to say that the fillings and the side of wedges were fabulous as well. It was definitely a "do yourself a favour" situation!


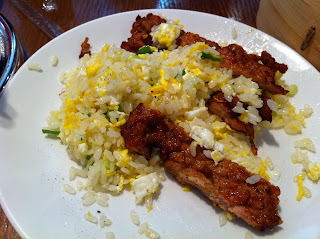
Having reinvigorated our desire for dumplings after a good dose of red meat in bread, the next day we headed back to what had become our favourite dumpling haunt. Fortunately it was just a hop, skip and jump from our hotel, at the top of the Silvercord Building in Tsim Sha Tsui. The resturant is called Din Tai Fung, and though it is not so traditional and does have a modern Coles caffeteria kind of thing going on, the dumplings were to die for. I guess that's expected when you have been awarded a little ole Michelin Star!! I've since discovered that "Dins", as we liked to call it, are popping up all over the place including Australia's very own in Sydney. We chowed down on prawn spring rolls, crumbed pork cutlet with egg fried rice and their signature xiao long bao (traditional chinese dumplings). The complimentary tea is beautiful and frangrant and the perfect accompaniement. And two little tips are to go and check out the chefs working their magic and love into the hundreds of perfect little dumplings through the viewing window and to read the information on how best to enjoy your dumplings using the combination of vinegar and soy. Delicious, relaxed, fun and did I say delicious? If I was in charge of dishing out the Michelin stars I would have given them one too! Oh, and for the record, The Silvercord building is also home to some great shops including a quirky little homewares spot in the basement where I once again cranked out the credit card! There is also a food court style eating area downstairs that has a whole range of Asian style food from Japanese & Korean to dumplings.


Before our tummies knew it, it was time to leave this paradise of eating and retail therapy. Before I did though I made sure that I checked out a local supermarket and picked up a few fabulous asian ingredients so that I can attempt to recreate some of these morsels as home. The best one I found was the Park N Shop at the Plaza Hollywood mall in East Kowloon (catch the underground to Diamond Hill) but there are heaps of little places dotted all around Hong Kong where you can pick up foodie bits and bobs...just keep your eyes peeled and remember to take into account customs and immigration rules on for your return.


Finally on our way out, when too much eating was clearly still not enough, we found ourselves having a flashback to our time living in London. Up in lights before our very eyes was a Pizza Express. For those of you not familiar, it's an English pizza restaurant chain that falls into the cheap and cheerful category and at this point the "cheap" part was especially relevant. We indulged in a great thin crust pizza, relaxed in their comfy lounge chairs and enjoyed the free Wi Fii access to help bring us back into the real world. It really was the perfect topping to a great shopping and eating experience.

Til next time...
Chin chin xx

Thursday, May 19, 2011

Family Friendly Minestrone Soup

Winter is about to arrive in the southern hemisphere and the cold has already set in here in Melbourne, Australia. I've jumped on board the soup and slow cooking train already and I couldn't be happier! There are so many positives....health & nutrition, great smells coming from the kitchen, cheaper cuts of meat, a great way to use up left over veggies not to mention simple to make!

Here is my recipe for a yummy and simple Minestrone Soup. Get the kids involved in this one too. They'll love chopping the bacon and grating the onion (under a watchful adult eye of course!), doing the measuring and tipping in the ingredients. I also find that when they have a hand in making it they will also be more likely to eat it...a win win in anyone's kitchen! It's also great to send along in a thermos to school with some fresh bread and butter as a great alternative to the vegemite sandwich and boomerang banana!

Here tis.....


Sal's Family Friendly Minestrone
serves at least 6 (with some leftovers)

1 can diced tomatoes
1 bottle tomato passata (500ml)
500 ml chicken stock (using organic stock cubes or boxed natural stock is fine!)
1 tbs brown sugar
S&P
2 tbs olive oil
1 tbs dried oregano
3 tbs risoni pasta (or other small pasta variety)
3 small carrots (peeled, halved lengthways and sliced about 1cm)
1 red onion (peeled and coarsley grated or finely chopped)
2 cloves garlic crushed
1/4 cup frozen corn kernels
1/4 cup frozen peas
1 cup canned cannellini beans (drained and rinsed well)
200g short cut rindless bacon cut into chunks
1 cup baby spinach leaves
1/4 cup chopped fresh basil or 1 tbs of squeezy tube basil (gourmet garden brand is good!)
1 large bay leaf
1/4 cup freshly grated parmesan

Method:
  1. heat a large heavy based pan on medium high and add olive oil
  2. saute bacon, onion and carrot and try to get some colour on them to give flavour, stirring often for about 4 mins, turn down to medium and add garlic and stir for another minute
  3. add the canned tomatoes, brown sugar and passta and stir well to combine
  4. add bay leaf and oregano and stock
  5. add pasta and stir to ensure none sticks to the bottom then bring to the boil stirring regularly
  6. turn down to a simmer and add corn, peas and cannellini beans - stir well
  7. let simmer uncovered for 10-15 mins
  8. stir through the spinach, parmesan and basil until wilted and combined
  9. season to taste with S&P
  10. serve with some nice bread and butter or cheese on toast as a great quick dinner!